Seven Considerations When Creating a Lighting Plan for Your Home
Imagine stepping into a haven bathed in light, crafted specifically for your needs and moods. Warm hues welcome you in, while focused task lighting empowers you to work or read with ease. Accentuated pieces capture your attention, transforming your space into a personalized masterpiece. This isn't magic, it's the power of a meticulously crafted lighting plan.
Creating your lighting plan early in the building or renovation process, ideally before the "first fix" stage, ensures optimal results. Even when working with existing fixtures in renovations, clever detailing and layering can lead to a fantastic plan.
Technical Tips
- Planning: Creating your lighting plan early, ideally before the "first fix" stage (when plumbing and electrical rough-ins occur), ensures optimal results. This stage allows for easier wiring and fixture placement.
- Electrical Considerations: Understand your electrical capacity and plan circuit placements based on your lighting needs. Consulting a qualified electrician is crucial for safe and efficient wiring.
- Fixture Research: Explore different fixture types (recessed, pendant, etc.) and their technical specifications like wattage, beam angle, and color temperature. Choose fixtures that suit your functional and aesthetic requirements.
The key lies in understanding how you use your space. As renowned interior designer Louise Misell emphasizes:
Take the time to sit in the space and think about how you use the room. How would you like it to feel at different times of the day? Take an open-plan kitchen diner for example, you'll need task lighting to prepare meals. Then when you are eating, you might prefer dimmed or softer lighting to set a relaxing mood. Thinking about the different functions each space has will help you plan your lighting needs for that room so that you can layer your lighting to create the appropriate mood.
Beyond function, consider these additional factors to personalize your lighting plan:
- Space purpose: Does it double as a study, craft area, or exercise zone?
- Artwork and photos: Are there cherished pieces you want to highlight?
- Users: Is it mainly used by older adults with different needs than young children?
- Time of day: When is it most used? Does natural light play a role?
Remember, your electrical and lighting plans are just as crucial as any other aspect of your future living space. Before construction begins, consider these seven essential tips to help craft a lighting plan that perfectly illuminates your life.
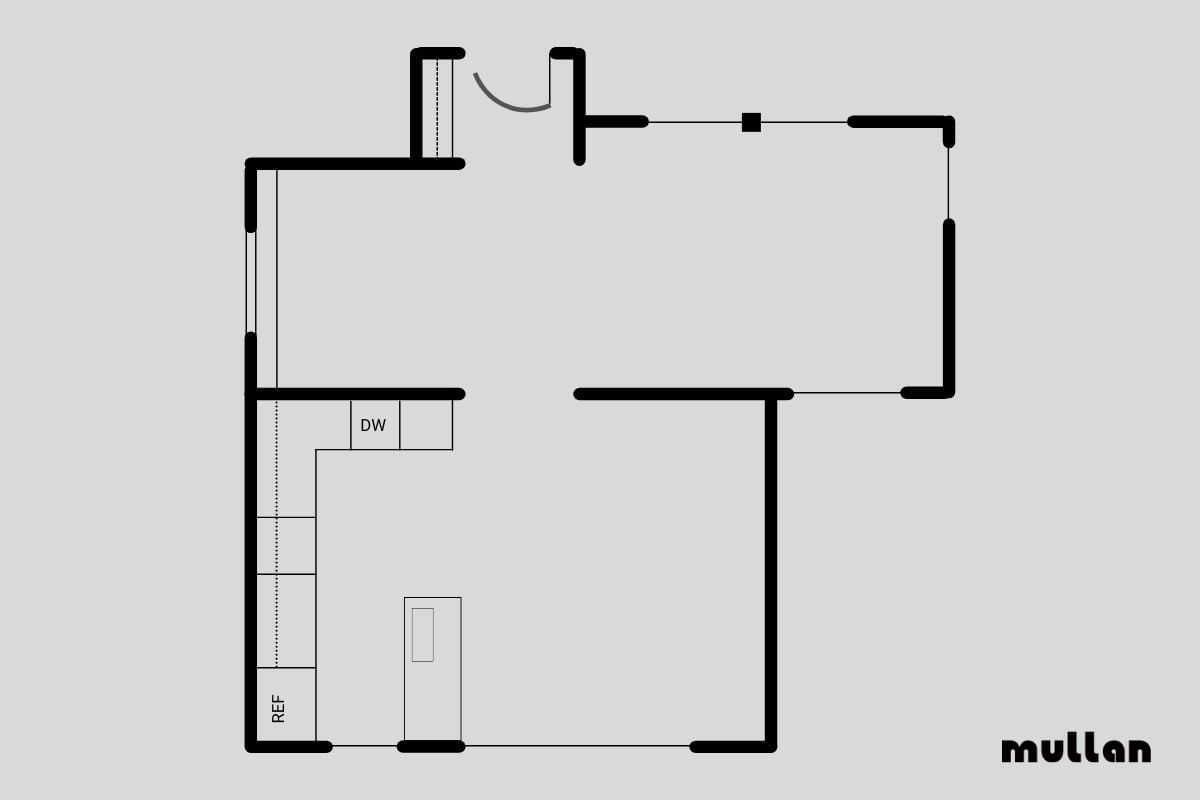
1. Draft Your Floor Plan
Begin your lighting plan by sketching a detailed floor plan of your space. This blueprint should include all rooms, indicating dimensions, windows, doors, and any permanent fixtures. A clear floor plan helps you visualize the space and effectively plan for both natural and artificial lighting. Understanding the layout is crucial for determining how light travels through your home, where shadows might fall, and how to enhance the room's features.
Technical Tips
- Recommended Scale: Use a scale of 1:50 for your floor plan to ensure clarity and precision.
- Natural Light: Note the direction of windows to gauge natural light throughout the day.
- Software Tools: Consider using digital floor planning tools for precision and ease of adjustments.
- Door Direction: Pay attention to the direction that doors open to avoid blocking light sources or planning fixtures in impractical locations.
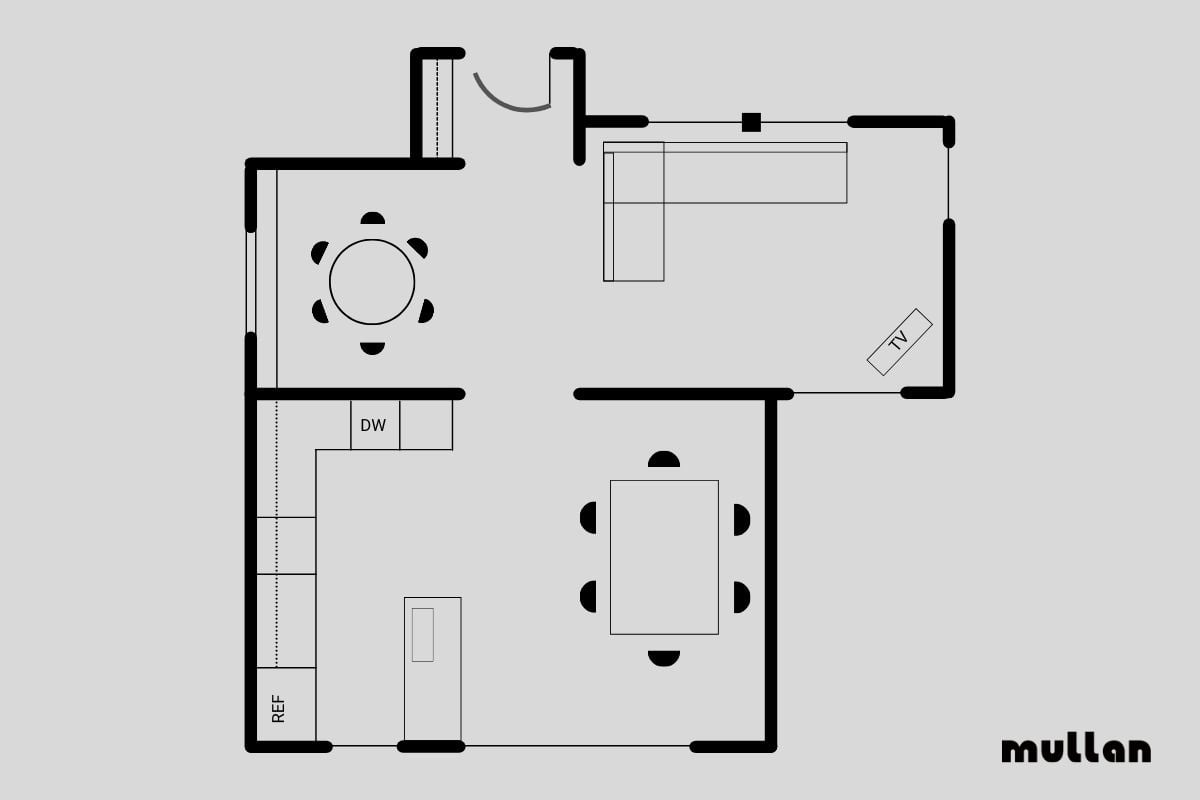
2. Mark Immovable Objects + Draw Your Furniture
Now that you have your floor plan, the next step is to mark immovable objects such as pillars, fireplaces, and built-in cabinets, and then sketch in your furniture. This layer of detail is vital for understanding how the space is utilized and where furniture will influence lighting choices. It helps in deciding the placement of task and accent lighting, ensuring that each area of your room is illuminated effectively according to its use.
Technical Tips
- Spatial Awareness: Consider the size and height of furniture and objects to determine the spread of light and avoid dark spots.
- Avoid Obstructing Light and Clutter: Ensure that large furniture does not block natural light sources or overshadow key areas that require illumination. Also, avoid over-furnishing spaces to ensure that light can flow freely and enhance the room's ambiance.
- Ceiling Considerations: Assess the height and features of your ceilings. This insight is crucial for selecting appropriate light fixtures and understanding how light distribution can be affected by ceiling characteristics.
3. Understand Room Functions
Understanding the primary and secondary functions of each room is crucial for an effective lighting plan. Whether it's a kitchen used for cooking and dining or a living room that doubles as a study, each activity has specific lighting needs. Adding in arrows to represent what direction people will be facing in the room can help later when we identify the placements of light fixtures. For example, sitting at a desk for working or facing towards the television.
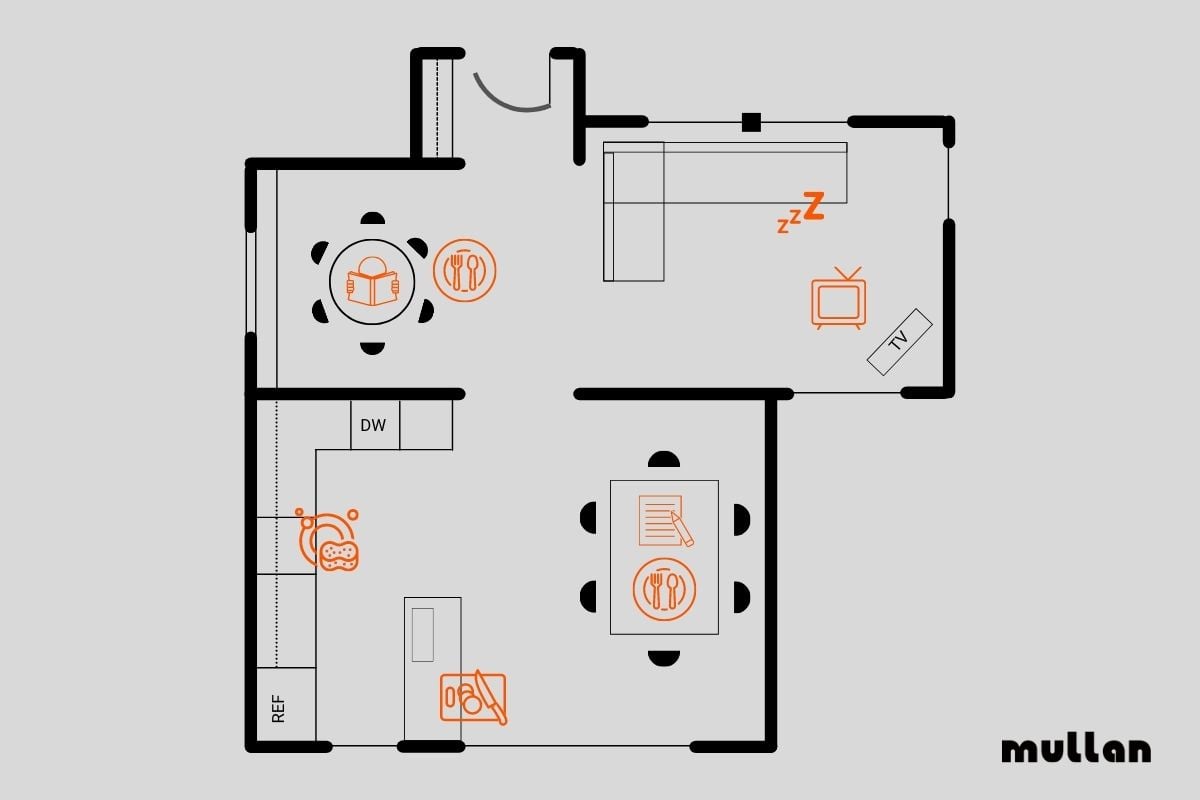
Technical Tips
- Multi-functional spaces: Listing all activities in each area helps incorporate flexibility into your lighting.
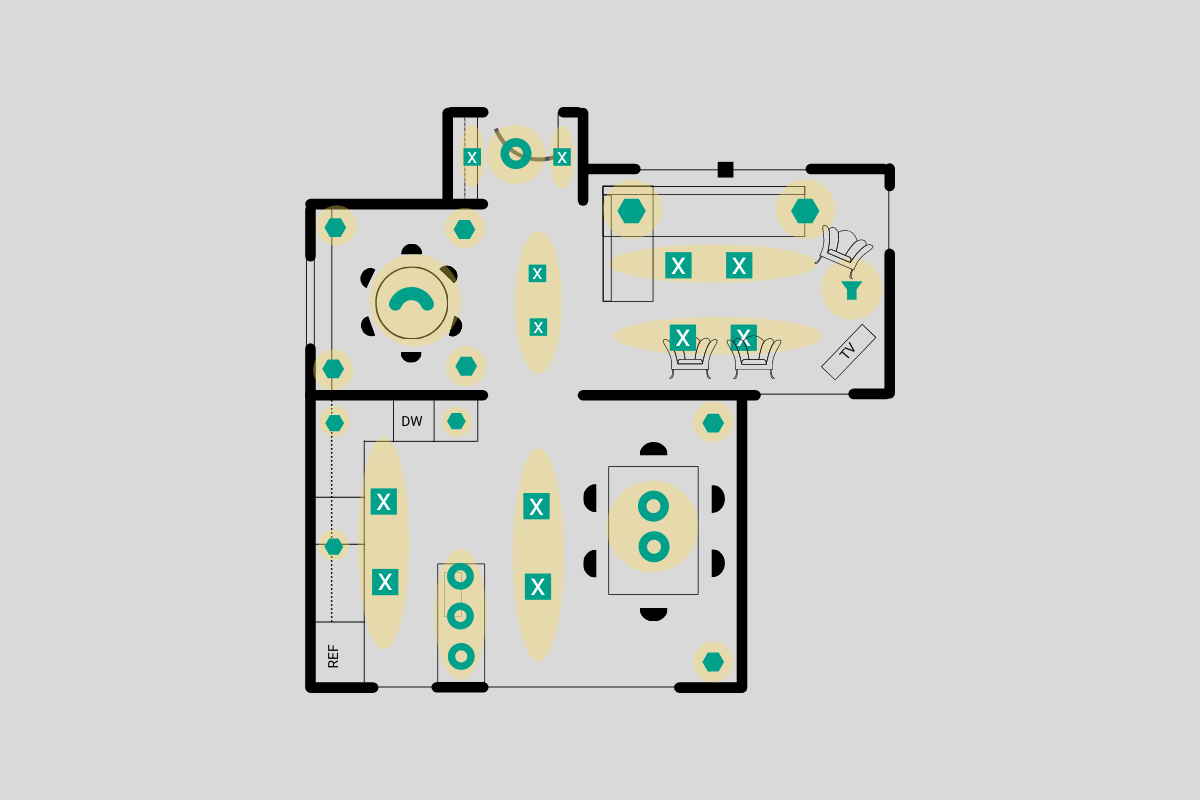
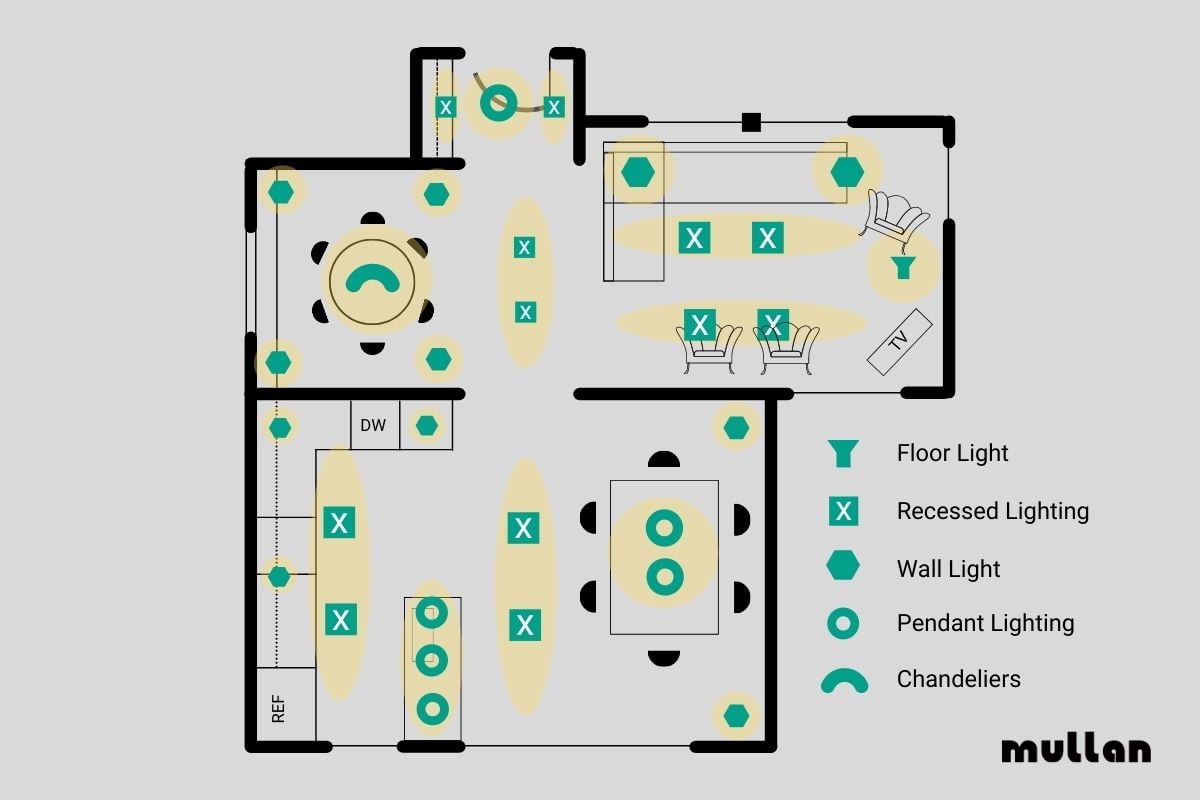
4. Choosing Lighting Fixtures and Placement
To achieve a balanced and functional lighting scheme, represent different types of lighting on your plan using symbols. Draw light circles where ambient lights like chandeliers will be placed for overall illumination, mark specific areas for task lighting such as under-cabinet lights, and indicate spots for accent lighting using picture lights, or uplights. Ensure these fixtures are spread out to avoid dark spots and overlapping, creating a harmonious lighting environment. For more detail on creating a lighting plan, refer to our Guide to Layering Light.
Here's a quick overview:
| Type of Lighting | Function | Example |
|---|---|---|
| Ambient Lighting | Overall illumination | Chandelier |
| Task Lighting | Focused lighting for tasks | Under-cabinet lights |
| Accent Lighting | Highlights features | Wall lights |
Selecting the right bulb involves considering lumens for brightness and color temperature for the light's warmth or coolness. Warm lights are ideal for relaxing areas like living rooms, while cool lights are better suited for workspaces. Additionally, it's crucial to calculate the amount of light needed in a room based on size and activity to ensure adequate illumination without being overwhelming. For a concise guide, check our article on calculating light amounts.
Technical Tips
- Consider the placement of each fixture type to support the room's primary and secondary functions.
- Visit our comprehensive guide on layered lighting for detailed insights and examples.
Special Note: Recessed Lights
- Common in open plan areas, increasing light and making spaces feel larger.
- Effective task and ambient lighting.
- For spacing, divide ceiling height by two. (For an 8ft ceiling, space them 4ft apart.)
- Place them at least 3ft away from walls to avoid creating shadows.
5. Sockets and Circuits
Proper planning of sockets and circuits is essential for a functional and safe lighting scheme. It's important to assess both current and future needs, ensuring enough outlets are available to accommodate your lighting without overloading. Strategically place light switches for convenience and safety, near entrances and common pathways. Also, record both existing and planned socket placements and lighting fittings on your lighting plan to have a comprehensive view of your space's electrical layout.

To ensure the safety and effectiveness of your lighting scheme, it's highly recommended to consult with a professional electrician for the installation and wiring of your chosen fixtures. This ensures that all work is up to code and optimally integrated into your overall design.
Technical Tips
- Socket Planning: Evaluate the room's layout, ensuring ample outlets for both current and future needs, minimizing the use of extension cords.
- Switch Placement: Install switches at entry points for ease of access, and consider dual switches for long hallways or staircases.
- Dimmers: Incorporate dimmer switches to adjust lighting intensity, suiting different activities and times.
- Recording Placement: Document existing and planned placements of sockets and fittings to ensure no area is overlooked and to facilitate any necessary adjustments.
6. Advanced Lighting and Energy Efficiency
Embrace the latest in lighting technology to enhance your home's functionality and energy efficiency. LED bulbs offer superior brightness and longevity while consuming less energy. Smart lighting systems allow for adjustments in color temperature and brightness via smart devices or voice commands. Automation with motion sensors optimizes energy use, activating lights only when needed. These advancements reduce your environmental footprint without compromising comfort or style.
Technical Tips
- LED Brightness: Select LED bulbs by their lumens rating for desired brightness, considering the room's size and use.
- Smart Lighting: Invest in smart lights compatible with your home's ecosystem for easy control over lighting scenes and schedules.
- Motion Sensors: Integrate motion sensors in high-traffic or transitional areas for energy savings and enhanced safety.
- Energy Efficiency: Look for energy-efficient lighting options, carefully considering their placement to maximize light distribution and minimize waste.
7. Final Checks
Before finalizing your lighting plan and proceeding with installation, it's crucial to double-check every detail. This ensures that your plan is comprehensive, practical, and aligns with your vision for each space.
- Review the placement and type of every light fixture.
- Confirm that all areas have adequate lighting according to their function.
- Verify that the controls are conveniently located and accessible.
- Ensure that the plan accommodates future flexibility and potential adjustments.
Checklist:
- All rooms have both ambient and task lighting as needed.
- Accent lighting is used to highlight architectural features or artwork.
- Light fixtures are correctly positioned to avoid glare and shadows.
- Energy-efficient bulbs are chosen for each fixture.
- Light switches and dimmers are placed logically throughout the home.
- The lighting plan has been reviewed by a professional electrician.
Integrating thoughtful lighting design not only enhances the functionality of each room but also ensures a cohesive aesthetic flow throughout your home. With your comprehensive lighting plan, you're prepared to collaborate effectively with your electrical contractor to bring your vision to life.


